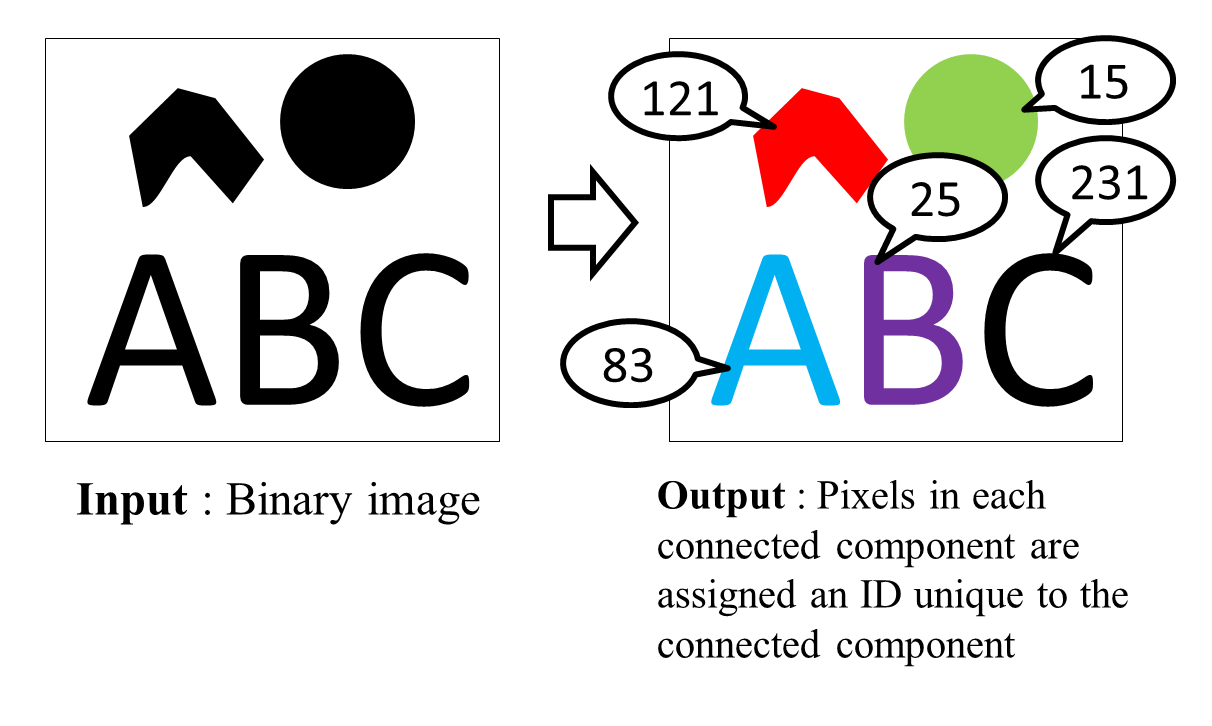
Fig. 1 What CCL is
by Naoki Shibata at Nara Institute of Science and Technology
Connected Component Labeling (CCL) is a well known technique for assigning a unique label to each of connected components in a given binary image(Fig. 1). It can be used for many purposes including marker detection.

Fig. 1 What CCL is
In this article, I will explain a CCL algorithm[1, 2] suitable for execution on GPGPU. In the algorithm, the kernel is applied to each of the pixels in the frame buffer several times. The kernel does not have a loop, and thus it finishes execution within a constant number of steps. The label propagates exponentially as the kernel is applied to the frame buffer. The kernel is designed so that it can be applied to the pixels in parallel.
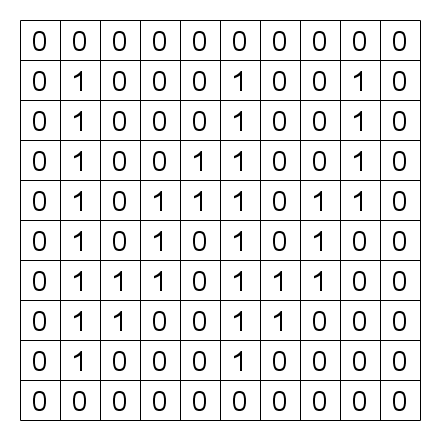
The proposed CCL algorithm takes a pointer fb to the frame buffer as its input. We assume that each element (pixel) of the frame buffer can store one 32-bit integer value. Each pixel has a unique address p, and it can be accessed by fb[p]. We also assume that the given image initially stored in the frame buffer is a binary image. If fb[p] is 0, the pixel is in the background color. Otherwise the pixel is in the foreground color. For the sake of simplicity, we assume that the pixels in the most perimeter including fb[0] are in the background color. We will explain the proposed algorithm using the example input image shown in Fig. 2. After executing the CCL algorithm, each pixel in the foreground color will be substituted with the label, which is the smallest address of the pixels in the same connected component, as shown in Fig. 9.
[1] Naoki Shibata, Shinya Yamamoto: GPGPU-Assisted Subpixel Tracking Method for Fiducial Markers, Journal of Information Processing, Vol.22(2014), No.1, pp.19-28, 2014-01. DOI:10.2197/ipsjjip.22.19 [PDF]
[2] Naoki Shibata, Shinya Yamamoto: SumiTag : Inconspicuous Fiducial Marker and GPGPU-Assisted Tracking Method, IPSJ SIG Technical Reports, Nov 2011. [PDF]
The algorithm consists of the preparation kernel and the propagation kernel. The preparation kernel is first applied to all the pixels once at the initial stage. As a result of, the pixels in the foreground color are substituted with the address of itself(Fig. 3).
kernel void preparation(global int *fb) {
  const int x = get_global_id(0), y = get_global_id(1);
  if (x == 0 || y == 0 || x >= WIDTH-1 || y >= HEIGHT-1) return;
  int ptr = y * WIDTH + x;

  fb[ptr] = (fb[ptr] == 0) ? 0 : ptr;
}
Algorithm 1 Preparation kernel
 |
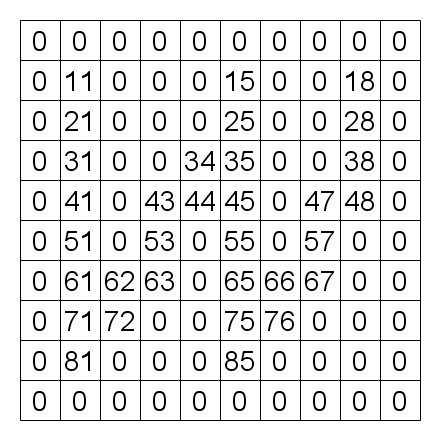 |
| Fig. 2 Input image | Fig. 3 After preparation |
The kernel below implements a naive label propagation algorithm. Function CCLSub returns the smallest label stored in the connected adjacent pixels. By applying the naive algorithm once to the all pixels, the labels can be propagated by one pixel as shown in Fig. 4.
kernel void naive(global int *fb) {
  const int x = get_global_id(0), y = get_global_id(1);
  if (x == 0 || y == 0 || x >= WIDTH-1 || y >= HEIGHT-1) return;
  int ptr = y * WIDTH + x;

  int g = CCLSub(fb, ptr);

  if (g != 0) {
    fb[ptr] = g;
  }
}

int CCLSub(global int *fb, int ptr) { // returns the smallest label stored in the connected adjacent pixels.
  int g = fb[ptr];

  for(int y=-1;y<=1;y++) {
    for(int x=-1;x<=1;x++) {
      int q = ptr + y*WIDTH + x;
      if (fb[q] != 0 && fb[q] < g) g = fb[q];
    }
  }

  return g;
}
Algorithm 2 Naive label propagation
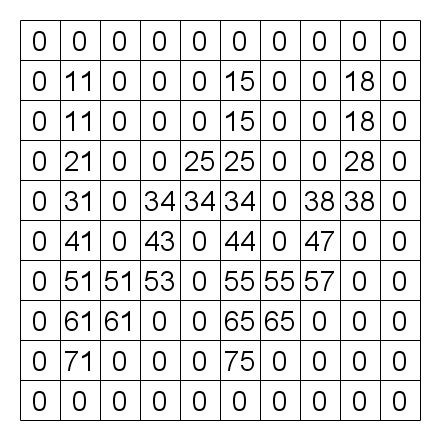 |
| Fig. 4 After 1st pass |
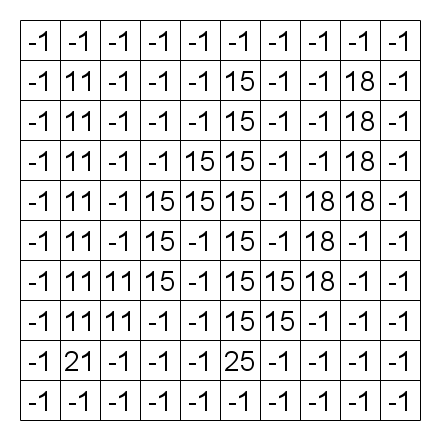
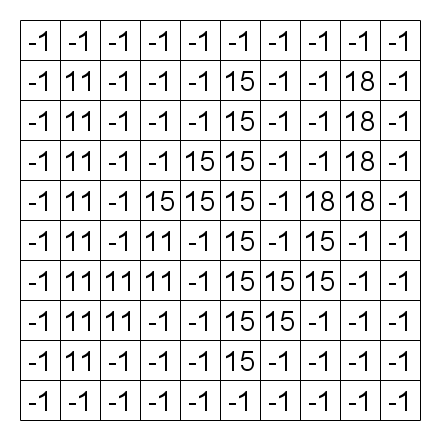
The algorithm below propagates labels faster. Applying this algorithm to Fig. 3 results in Fig. 4. At this step, We see no difference between the naive algorithm and the faster algorithm. However, after we apply the algorithm again, the faster algorithm gives the result shown in Fig. 5. By the effect of line 9 in the algorithm below, labels are propagated further than 1 pixel. However, if we apply the algorithm once or twice more, we get the results shown in Fig. 6 and 7, respectively. We see that after the labels are once propagated vertically to the ends, the algorithm propagates labels by only constant pixels with each kernel application.
kernel void slow(global int *fb) {
  const int x = get_global_id(0), y = get_global_id(1);
  if (x == 0 || y == 0 || x >= WIDTH-1 || y >= HEIGHT-1) return;
  int ptr = y * WIDTH + x;

  int g = CCLSub(fb, ptr);

  if (g != 0) {
    fb[ptr] = fb[fb[fb[fb[g]]]];
  }
}
Algorithm 3 Faster, but still not fast enough
 |
 |
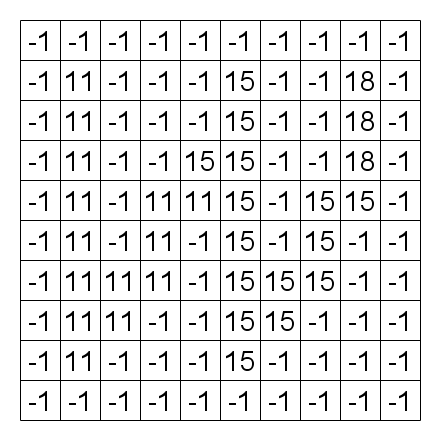 |
| Fig. 5 After 2nd pass | Fig. 6 After 3rd pass using the Slow Algorithm | Fig. 7 After 4th pass using the Slow Algorithm |
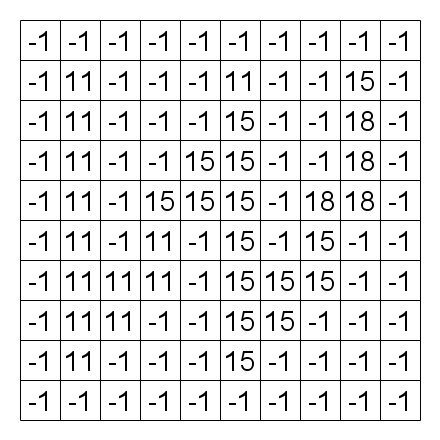
The fast CCL algorithm is shown below. This algorithm propagates labels fast after the labels propagate vertically to the ends. Applying this algorithm to the pixels in Fig. 5 gives the pixels in Fig. 8. In the next application of the kernel, label 11 propagates to the all pixels that have labels 15 or 18 (Fig. 9).
kernel void fastCCL(global int *fb) {
  const int x = get_global_id(0), y = get_global_id(1);
  if (x == 0 || y == 0 || x >= WIDTH-1 || y >= HEIGHT-1) return;
  int ptr = y * WIDTH + x;

  int h = fb[ptr];
  int g = CCLSub(fb, ptr);

  if (g != 0) {
    g = fb[fb[fb[fb[g]]]];
    atomic { fb[h] = min(fb[h], g); }
    atomic { fb[ptr] = min(fb[ptr], g); }
  }
}
Algorithm 4 The fast CCL kernel
 |
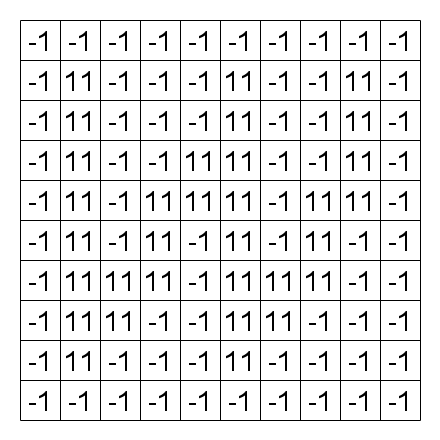 |
| Fig. 8 After 3rd pass using the Fast Algorithm | Fig. 9 After 4th pass using the Fast Algorithm |
The following is a non-parallel implementation in Java, that is provided to help understanding.
// http://ito-lab.naist.jp/~n-sibata/cclarticle/index.xhtml

import java.io.*;
import java.awt.image.*;
import javax.imageio.*;

public class Label8 {
    static final int NPASS = 11;

    static void preparation(int[][] fb, int iw, int ih) {
        for(int y=0;y < ih;y++) {
            for(int x=0;x < iw;x++) {
		int ptr = y * iw + x;
		fb[0][ptr] = (fb[0][ptr] == 0) ? -1 : ptr;
            }
        }
    }

    static int CCLSub(int[][] fb, int pass, int x0, int y0, int iw, int ih) {
	int g = fb[pass-1][y0 * iw + x0];

	for(int y=-1;y<=1;y++) {
	    if (y + y0 < 0 || y + y0 >= ih) continue;
	    for(int x=-1;x<=1;x++) {
		if (x + x0 < 0 || x + x0 >= iw) continue;
		int q = (y + y0)*iw + x + x0;
		if (fb[pass-1][q] != -1 && fb[pass-1][q] < g) g = fb[pass-1][q];
	    }
	}

	return g;
    }

    static void propagation(int[][] fb, int pass, int iw, int ih) {
	for(int y=0;y < ih;y++) {
	    for(int x=0;x < iw;x++) {
		int ptr = y * iw + x;

		fb[pass][ptr] = fb[pass-1][ptr];

		int h = fb[pass-1][ptr];
		int g = CCLSub(fb, pass, x, y, iw, ih);

		if (g != -1) {
		    for(int i=0;i<6;i++) g = fb[pass-1][g];

		    fb[pass][h  ] = fb[pass][h  ] < g ? fb[pass][h  ] : g; // !! Atomic, referring result of current pass
		    fb[pass][ptr] = fb[pass][ptr] < g ? fb[pass][ptr] : g; // !! Atomic
		}
	    }
	}
    }

    static void label8(int[][] fb, int iw, int ih) {
	preparation(fb, iw, ih);

        for(int pass=1;pass<NPASS;pass++) {
	    propagation(fb, pass, iw, ih);
        }
    }

    public static void main(String[] args) throws Exception {
	System.setProperty("java.awt.headless", "true");
	BufferedImage inImage = ImageIO.read(new File(args[0]));
	int iw = inImage.getWidth(), ih = inImage.getHeight();

	int[][] fb = new int[NPASS][iw * ih];

        for(int y = 0;y < ih;y++) {
            for(int x = 0;x < iw;x++) {
		fb[0][y * iw + x] = ((inImage.getRGB(x, y) >> 8) & 255) > 127 ? 1 : 0;
            }
        }

	label8(fb, iw, ih);

	BufferedImage outImage = new BufferedImage(iw, ih, BufferedImage.TYPE_3BYTE_BGR);
        for(int y = 0;y < ih;y++) {
            for(int x = 0;x < iw;x++) {
		outImage.setRGB(x, y, fb[NPASS-1][y * iw + x] == -1 ? 0 : (fb[NPASS-1][y * iw + x]  * 1103515245 + 12345));
            }
        }
	ImageIO.write(outImage, "png", new File("output.png"));
    }
}
Java implementation
You can also try an OpenCL implementation. You can browse the source codes at github.
Example input and output images are shown below.
The following tables show kernel execution time obtained by OpenCL profiling information.
|
|
|
|
|
|
The archive also includes a single-threaded CPU implementation that utilizes AVX2 instructions. The following tables show execution times of this implementation.
Please note that the value labeled to each connected component by the AVX2 implementation differs from the value labeled by the OpenCL implementation. This is due to difference in data alignment.
|
|
Naoki Shibata at Nara Institute of Science and Technology
e-mail : ![]()